Installing a grooved rigid coupling in a piping system typically involves several steps, and specific tools and techniques are used to ensure a secure and leak-free connection.
Here’s a general overview of how a grooved rigid coupling is installed:
Tools and Materials:
- Grooved rigid coupling
- Pipe sections to be joined
- Pipe wrench or pipe vise
- Torque wrench
- Gaskets (if required)
- Lubricant
- Lubrication applicator
- Bolts and nuts (provided with the coupling)
Installation Steps:
- Prepare the Pipe Ends:
- Cut the pipe ends cleanly and ensure they are square and free of any burrs or debris. Properly preparing the pipe ends is crucial for a secure connection.
- Select the Appropriate Coupling Size:
- Ensure that the grooved rigid coupling you are using matches the size of the pipe to be joined. Size compatibility is critical for a proper fit.
- Assemble the Coupling:
- Position the coupling halves on either end of the pipe sections, ensuring that the grooved ends of the pipes align with the grooves in the coupling. If a gasket is required, insert it between the coupling halves.
- Tighten the Bolts:
- Insert the bolts through the holes in the coupling and hand-tighten the nuts onto the bolts. Start with only a few threads engaged to allow for adjustments.
- Align the Pipes:
- Ensure that the pipes are properly aligned and that the gap between them is even. The pipes should meet at the center of the coupling.
- Apply Lubricant:
- Apply lubricant to the bolt threads and the face of the nuts. The lubricant helps to achieve even torque distribution and ensures proper sealing.
- Torque the Bolts:
- Use a torque wrench to tighten the nuts evenly in a crisscross pattern. Gradually increase the torque to the manufacturer’s specified value. This ensures that the coupling is securely clamped onto the pipe ends and that the gasket (if used) is compressed to create a leak-free seal.
- Check Alignment:
- After tightening, double-check that the pipes are still properly aligned and that the coupling is centered.
- Inspect for Leaks:
- After installation, perform a leak test to ensure that the connection is watertight. You can do this by pressurizing the system and inspecting for any signs of leakage.
- Securely Fasten the Coupling:
- Tighten the bolts to the final specified torque value to ensure that the coupling is securely fastened to the pipe ends.
- Complete the Installation:
- Once the coupling is properly installed, the piping system can be put into service as needed.
Proper installation of a grooved rigid coupling is essential for creating a reliable and leak-free connection. Following the manufacturer’s instructions and recommended torque values is crucial to achieving a secure and durable coupling. Grooved Rigid Coupling 3/4 Cast Iron Coupling Additionally, adherence to safety protocols during installation is important to prevent accidents or injuries.
What is a grooved rigid coupling, and how does it differ from other types of couplings used in piping systems?
A grooved rigid coupling is a mechanical pipe joining method that is designed to connect two pipes together in a secure and leak-free manner. It is typically used in piping systems for various applications, including water distribution, fire protection, and HVAC systems.
Here’s an explanation of grooved rigid couplings and how they differ from other types of couplings:
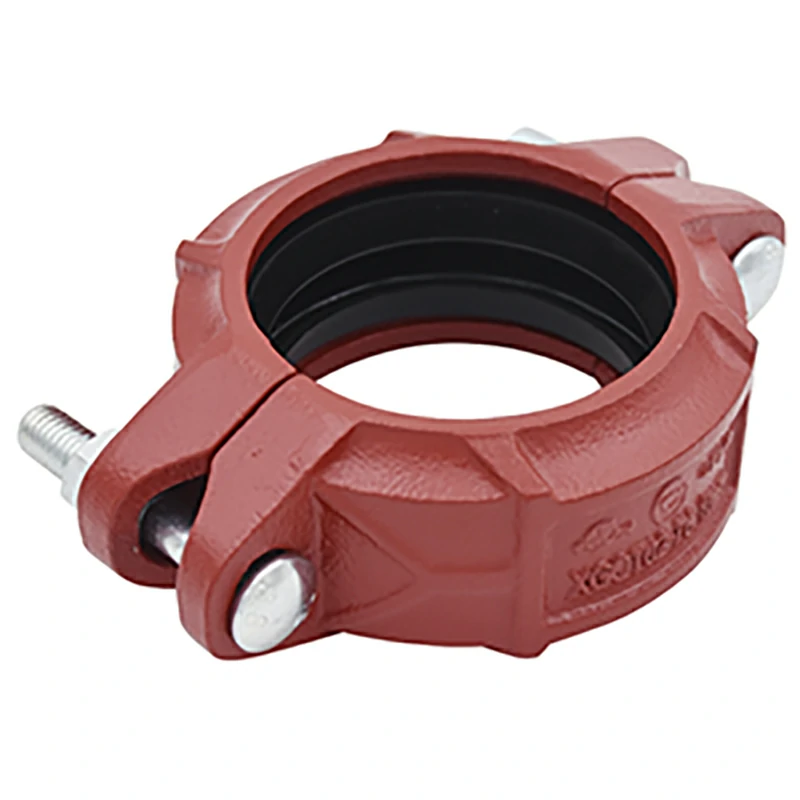
Grooved Rigid Coupling:
- Design: A grooved rigid coupling consists of two segments or halves that are joined together over the ends of two grooved pipes. These segments are typically made of materials like ductile iron or stainless steel. The coupling segments have grooves that match the grooves on the pipe ends.
- Assembly: To install a grooved rigid coupling, the two segments are placed over the grooved pipe ends and secured using bolts and nuts. The bolts are tightened evenly to create a clamping force that holds the pipes securely together. The rigidity of this type of coupling prevents angular and axial movement of the pipes.
- Gasket: Some grooved rigid couplings incorporate a gasket to create a watertight seal between the pipes. The gasket is compressed between the coupling segments and the grooved pipe ends during assembly.
Differences from Other Couplings:
- Flexibility: Grooved rigid couplings are designed to be, as the name suggests, rigid. They do not provide flexibility or movement between the connected pipes. This differs from flexible couplings, which allow some degree of movement and absorption of vibrations.
- Leak Resistance: Grooved rigid couplings are known for their reliability and resistance to leakage. The combination of a rigid design and gasket (if used) provides a strong and secure seal, making them ideal for pressurized systems.
- Ease of Installation: Grooved rigid couplings are relatively easy to install, as they do not require welding or special tools. This ease of installation makes them a popular choice for a wide range of applications.
- Applications: Grooved rigid couplings are commonly used in commercial, industrial, and municipal piping systems, including fire sprinkler systems, water distribution, and HVAC systems. They are well-suited for applications where leak prevention and durability are critical.
- Materials: Grooved rigid couplings are available in various materials, including ductile iron, stainless steel, and other alloys. The choice of material depends on the specific requirements of the application.
- Sealing Mechanism: Unlike welding, which fuses the pipe ends together, grooved rigid couplings rely on the compressive force of the coupling segments to create a seal. This makes them easier to disassemble and reassemble if needed.
In summary, grooved rigid couplings offer a secure and leak-resistant method of joining pipes in a piping system. They are distinguished by their rigid design, use of gaskets for sealing, and ease of installation. These couplings are commonly used in applications where maintaining the integrity of the piping system is a top priority.